How to work with margins in Word 2013
Want to know how to set a new default margin for every new document you create, or how to set a margin for a footnote? We've got some margin tips right here

Here's another in our series of how to articles looking at the basics of Word 2013, for those still trying to get to grips with Microsoft's word processor. In this instalment, we're going to look at margins, and how to set a custom and default margin, and also how to work with a few of the finer points such as adjusting the margin where the footer is concerned.
Okay, first things first for the completely uninitiated – what is a margin? It's simply the space to the left and right (or top/bottom) of the text on the page. There's always a gap to give some breathing room, just to get things looking neat, or indeed to scribble notes in if you print a document out. You can make that gap larger or smaller, depending on your tastes, and here's how.
To change the size of the margin in a document you are working on, click on the Page Layout tab at the top of the ribbon (in between Design and References), then click on the Margins icon on the far left. In the drop-down menu that appears, right at the bottom you'll see Custom Margins – click on this.
The Page Setup dialogue box appears, and you want to focus your attention on the Margins section at the top of this. If you want to increase the size of the right margin, for example, you simply click on the box that says Right, and enter the new value (in centimetres by default).
Want to double the size of both left and right margins? Simply double the number of centimetres in both Left and Right boxes. You can also adjust the values using the little up and down arrows to the right of the numbers. When you've adjusted your values, click OK at the bottom, and your page will magically snap into the new scheme of things.
If you'd like to set a margin (like the one you've just made) as the default margin – that is, this particular margin layout will become the default scheme every time you create a new document – that's easy, too. When you're specifying a margin as above, in the Page Setup dialogue box, you can simply click the Set As Default button at the bottom left of the box, then click Yes.
And that's all there is to it.
Get the ITPro. daily newsletter
Receive our latest news, industry updates, featured resources and more. Sign up today to receive our FREE report on AI cyber crime & security - newly updated for 2024.
What about if you want your page margin on the actual body text of the page to stay the same, and you just want to move the margin for another part of the page – say, for example, a footnote? (See our guide on how to insert and edit footnotes for more on those, incidentally).
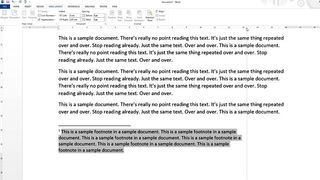
To make the footnote margin wider, simply select the footnote text by highlighting all of it with the cursor. Leave it selected, and then move your mouse up to the ruler bar – the thin bar with numbers on it just underneath the Ribbon menu at the top. (If you can't see that bar, then you might have removed it – you can reinstate the ruler by clicking on the View tab in the Ribbon, then look at the second box from the left – the top checkbox says Ruler, so tick this and it will appear).

The dark section of the ruler shows where the page margin space is. See the little triangle on the right-hand side of the ruler? Well, grab that with your mouse (click the left button and hold it down), and pull it over to the left (a line will appear on the page as you do so, showing the location of the margin). As you pull it left, you'll make the right-hand margin bigger, but just for the footnote and not the whole page (see the image above). Let go of the mouse button when you're done – that's all there is to it (though if you decide you want to make further adjustments, you can simply drag the triangle in the ruler again).
Darren has over 25 years of experience in digital and magazine publishing as a writer and editor. He's also an author, having co-written a novel published by Little, Brown (Hachette UK). He currently writes news, features and buying guides for TechRadar, and occasionally other Future websites such as T3 or Creative Bloq and he's a copy editor for TechRadar Pro. Darrran has written for a large number of tech and gaming websites/magazines in the past, including Web User and ComputerActive. He has also worked at IDG Media, having been the Editor of PC Games Solutions and the Deputy Editor of PC Home.


