How to insert a tick or a cross symbol in Microsoft Word and Excel
There are several ways to insert a tick symbol into Microsoft Word – these are the best options

Microsoft Word and Excel are two important applications in the Microsoft Office suite. And with more online functionality than ever, the latest versions of the software are considered some of the best online collaboration tools a business can use today.
One issue that Microsoft Office users often run into is how to insert a tick or a cross into a Word or Excel document.
These symbols are nowhere to be found on a keyboard, so you need to discover another way to make them. Thankfully, it’s a simple process, and there are a few ways you can do this. We cover the five best ways to insert a tick or a cross into a Word or Excel document below.
How to insert a tick or a cross symbol in Microsoft Word and Excel: Preparation
Clearly you’ll need a copy of Microsoft Office to perform these tasks, and we recommend Microsoft 365 over all the other alternatives to Microsoft Office. Over the past few years, features like AutoSave, editing using a mobile device, and threaded commenting in Excel have made team collaboration easier in Microsoft’s office productivity software.
If you have a standalone version of Microsoft Office, the examples below will also work on Office 2004 and above. However, the arrangement of the interface menus differs significantly between versions.
Option 1: Copy and paste from the below symbols
To copy and paste a tick or cross, simply highlight one of the ticks or crosses below, then copy and paste it to your destination. Highlight (or double-click on) your preferred symbol below:
✓
✔
Get the ITPro. daily newsletter
Receive our latest news, industry updates, featured resources and more. Sign up today to receive our FREE report on AI cyber crime & security - newly updated for 2024.
☑
✅
✕
✖
✗
✘
To Copy – once the symbol is highlighted press Ctrl + C (or right-click and select Copy from the menu).
Then place the cursor in the desired document (or select a cell).
To Paste – select where you want the symbol and press Ctrl + V (or right-click and select Paste from the menu).
Option 2: Insert a tick or a cross using the Symbol menu

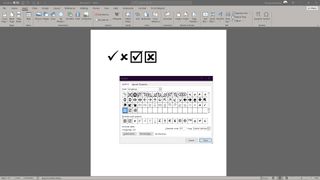
The first way to add a tick or a cross to a Word or Excel document is through the Symbol menu. You’ll find it under the Insert menu, which is on the ribbon at the top of the screen.
Click on Symbol and choose More Symbols. Change the font to Wingdings in the Font select box. Scroll to the bottom, and you’ll find two different styles of ticks and crosses. Choose the symbol you prefer and click Insert.
- Click the Insert tab in the menu ribbon at the top of the screen
- Click Symbol
- Click More Symbols
- In the Font selection box, change the font to Wingdings
- Scroll down to the bottom to find two different styles of ticks and crosses
- Find a style you like and click Insert
Option 3: Insert a tick or a cross using the character code

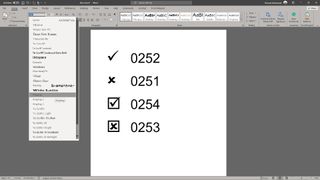
As a slight shortcut, you can insert a tick or a cross by first changing the font to Wingdings, then entering the character codes directly. This only works if your computer’s keyboard has a separate numpad.
The two codes we will be using are:
Tick: 0252
Tick with a box: 0254
Cross: 0251
Cross with a box: 0253
- Click in the document where you want the symbol to appear
- Change the font to Wingdings
- Hold down the Alt button, type the four-digit code listed above, and then release the alt button.
Option 4: Insert a tick or a cross with a built-in keyboard shortcut

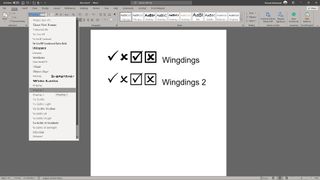
Another alternative is to use built-in keyboard shortcuts in conjunction with another font called Wingdings 2. To do this:
Set the font to Wingdings 2 in your document where you want the tick or cross to be added. Press Shift+P for a tick or Shift+O for a cross.
If you prefer them to be in boxes, press Shift+R or Shift+Q.
Option 5: Set your own keyboard shortcuts for the tick or cross

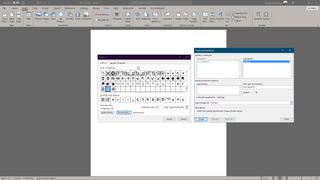
Finally, you can set up your own keyboard shortcut that will speed up the process of inserting ticks and crosses in the future. You can do this by finding the relevant symbol in the Symbol menu and choosing a shortcut key.
- Click Insert from the top ribbon menu
- Select Symbol, then more Symbols
- In the font selector, select Wingdings or Wingdings 2 and find the symbol you prefer
- Click the Shortcut Key button and enter your own combination of keys (e.g. Ctrl + Shift + T)
- Click Assign
- Test the shortcut by pressing the key combination in your document
Summary
We’ve outlined five ways to insert ticks and crosses into your Microsoft Word and Excel documents. You can use the Symbol menu, enter the character code, or use a keyboard shortcut.
The Microsoft Office suite is in our list of the best tools and apps for remote workers, though we’ve found that many companies still aren’t making the most of Microsoft 365, because employees aren’t always aware of all the features that are available to them.
For more information on how to get the best out of Microsoft Word and Excel, we’ve put together a few guides. We discuss how to use the Microsoft Office Ribbon and how to start page numbering from a specific page in Microsoft Word. You may also find it useful to learn how to insert and edit footnotes in Microsoft Word.
Richard brings more than 20 years of computer science, full-stack development and business operations experience to ITPro. A graduate in Computer Science and former IT support manager at Samsung, Richard has taught courses in Java, PHP and Perl, and developed software for both private businesses and state organisations. A prolific author in B2B and B2C tech, Richard has written material for Samsung, TechRadar Pro, and now ITPro.


